Sunday, December 11, 2016

Meet Me Under the Mistletoe


Couldn't have a more perfect image for a special Christmas card for my better half lol.


Lisa asked her Facebook Group, Bloobel Stamps - Digital Stamps Create and Share, for ideas for images and this was my idea.  I was thinking ahead to Christmas (ya, really... and this was back in September lol) and had this picture in my head of what I thought I might like to do for hubby.  The second I saw Lisa's rendition, I knew I had to have it.

It's been coloured up since October and I've been busy with other commitments and just didn't know what kind of card I wanted to create with it.  And then... it took me 2-3 days to create.  I'd have an idea, then dismiss it.  I'd have a layout in mind.  Didn't like.  A colour palette... nyah.  And so on. 


This is a vertical step card.  Coloured with Copics, papers and cardstock are Stampin' Up, dies from various companies.  I created the sentiment in Word.

Hope you like it.

Merry Christmas to all of you!

~Shelley

Tuesday, December 6, 2016

Happy Birthday to a Special Lady

Birthdays are fun.  Colouring and creating cards for birthdays is fun.  Creating a special card for a special lady on a MILESTONE birthday... priceless :-).

So, the card has now been received and I can share.

Happy Birthday RHEA!

And where would I turn for a special image for the card?  Bloobel Stamps of course.  The second I saw the "It's Behind You" (scared man), I KNEW what I was going to use it for.  This special birthday. 

I've made a 5" x 7" Pivot and Twist Card.

Recipe:
Stamp - Bloobel Stamps, It's Behind You
Creative Basics Dies - Basic Stitched Flags
Stampin' Up - Paper, Cardstock, Number Dies, Owl, Balloons, stamps, inks
Medium - Copics on Xpress-It Blending Card
BV20-E50-51-21-11-93 (skin)
B91-95-97-99; colourless blender (jeans)
E53-57-44-59-Y11-YR21 (hair)
BV20-23-25-29 (jacket)
BG11-72-75 (shirt)
B000-95; C3-1-00 (eyes)
C5-7-9 (shoes)
BV20-23-25 (ground)
C1 (outline shadow side)


Happy Birthday, Rhea! xo

Join us at Passionate Paper Creations & Friends Facebook Group.  It's "Birthday Week" and there are games, challenges and fun all week!

~Shelley


Monday, November 28, 2016

Christmas Fun and Flash Sale

And there's a Flash Sale going on right now in the Angels Hearts and Memories Etsy Shop!  All digis for just $1 each!


Coloured with Copics
Patterned Papers and Cardstock from Stampin' Up


If you colour up any of the images, please be sure to join and share in the Angels Hearts and Memories Facebook Group and the Papercrafting Support Group!  


~Shelley
 

Thursday, November 17, 2016

Holly Angel


This is Holly Angel.  Isn't she beautiful?!  I loved this image as soon as I saw it and the rest of the release is just as stinkin' cute :-).

You can find your own in the Etsy Store of Angels Hearts and Memories AND they are all on SALE!  Run don't walk lol.  I've got 'em all coloured up and will showcase them shortly.

Coloured with Copics:
Skin - E50-51-21-11-BV20; R20
Eyes - B91-93-C3
Hair - E50-51-53-97
Wings - C00-1-3
Dress/gown - B91-93; colourless blender
Red - R20-24-39
Green - G82-YG17-G17
Background - BG0000-000-11
Pearl Belt - RV91
Clear Wink of Stella

Dies: Penny Black (snowflakes); Cheery Lynn (Holly); Frantic Stamper (Music); Gina K (Stitched Rectangles); Marianne (Holly Wreath)

Stampin' Up: Cardstock; paper (retired)

If you colour her up (or any of the other images), please be sure to share her in the Angels Hearts and Memories Facebook Group and the Papercrafting Support Group!

Thanks for looking!

~Shelley

Friday, November 4, 2016

Reindeer Games

We're playing Reindeer Games with Little Miss Muffet Stamps on Passionate Paper Creations and Friends Facebook Group this weekend!


There is a new release of fabulously cute Reindeer images at LMMS.  I've created my card with Reindeer Smooches.


Recipe:

 
Stampin' Up - Cardstock, Woodland EF, rhinestones, Decorative Paper (retired) 
Dee's Distinctively, Merry Christmas die

Lawn Fawn, Snowflake dies

Copics - E21-25-29, E42-43-44; E42-W5; YG63-G46-G29; YG25-17-67; R21-24-27-29-39; Y11-E25-29; R21-W3-5; R21-E04


Thanks for visiting today and hope to see you over in the Passionate Paper Creations & Friends Facebook Group! 

~Shelley


Thursday, November 3, 2016

Thanksgiving with Pilgrims and Chocolate

Today I want to show you just how quick and easy it is to create a wonderful table for Thanksgiving using Creative Basics Pierced Ovals.


I have used: Basic Pierced Ovals 

I simply cut a 6" x 6" piece of cardstock, scored it at 3", adhered my decorative paper front and back and then lay the 1/2 oval easel card maker die on the scoreline and ran it through my die cutting machine.  Voila, I had a free-standing place card base to decorate for the Thanksgiving table!


  Simple but I think great to dress up the table (our Canadian Thanksgiving is past but I might be re-purposing this for Christmas dinner or next year). 
 

I used the Thanksgiving Pilgrim from Angels Hearts and Memories Fall bundle release.  She coloured up fairly quickly with my Copics and I think it'd be a great image to "assembly line" for these placecards.  Even changing up the colour of the outfit. 

That fabulous Hershey Kiss Turkey (did you say chocolate?!) is the latest pattern packet from my friend Brenda at Qbee's Quest, be sure to check out her other tutorials while you're there as there is something for almost every occasion you could possibly imagine. 


Recipe:

Creative Basics Dies, Basic Pierced Ovals

Copics - E50-51-21-11, BV02, E93; Y32-E23-25-27-59; Y32-E23-27; E43-44-47-49; Y32-E23-25; G20-24; E40-41-42, "0"

Supplies: Stampin' Up Apothecary Accents Thinlits (retired), DSP (retired), Old Olive cardstock, Gold glimmer paper; Layered Circle Framelits, Owl Builder Punch and Wonderful Wreath Thinlits (for the turkey)

Image: Digital Stamp from Angels Hearts and Memories, Thanksgiving Pilgrim

Qbee's Quest for the Hershey Kiss Turkey

Thanks for visiting today and hope to see you over in the Passionate Paper Creations & Friends Facebook Group! 

~Shelley


Friday, October 21, 2016

Amy Paints

Such a sweet image for a young girl to use for a birthday, thinking of you or just "because" card.


I used the Fancy Squares & Little Things to make a flip card (kind of a reverse easel card).

Copics -
Skin: E50-51-21-11-BV02
Hair: E59-57-34-YR21
Head Scarf: YR21-14-18; RV29-0
Orange: YR21-14-18
Pink: RV23-25-29
Green: G43-YG63-G46
Magazine: E41 and various colours
Ipod: T1-3-5
Ground: E42-43-44; BV25


Thursday, October 20, 2016

Pivot Twist Pop Up with Bloobel

I have had a few requests with how I made this fancy fold card.  They seem to be the "flavour of the day" due in large part to an awesome tutorial by Dawn Griffith (link here).  It was just a little too fussy for me to make a "card class" for my girls with (they get a cool Christmas card in a couple of weeks) as it involves a whole center panel so I took it apart and figured I just needed a center mechanism and then the search was on to try to find measurements/recipe.  I did find something but for the life of me, I can't find it again to link here (apologies to the creator).  If I do find it, I will edit this post.  There is a die out there that can be used too but... this is just fun (and cheaper lol).

So, for now, I've done a quick mock-up with some copy paper to try to show you.  The most important part is the center mechanism.  I've worked out for a smaller mechanism and a horizontal card, but let me show and tell the standard A2 size.  This particular size of mechanism is the most sturdy.

8" x 3-1/2" cardstock.  Score on the short side down the center at 1-3/4".  With a pencil, mark 2-1/4" in from each side, top and bottom, on the long sides (see pic) and then with a ruler, score to connect the diagonals.  Valley fold the center, mountain fold the diagonals and then "pinch" the valley fold each side of the center diagonal and pull the right and left side toward you and you will see it start to "pop up" and form "legs" with a triangle on top lol.


Now take the folded mechanism and place it at the center fold of the card with the "legs" toward the bottom and put glue only on the triangle, close card and repeat on the other side.  Let dry, then open flat for the next step.  NOTE: if you want decorative paper inside, do it BEFORE you glue the mechanism in place.

The center "panel" for the A2 is 3-1/2" x 10" scored at 2-1/2", 5" and 7-1/2".  Burnish the scorelines, then center it on the mechanism.  Fold up the two outside panels toward the center, put adhesive on the indicated spots of the now exposed mechanism;then unfold the "wings" of the panel and adhere them onto the adhesive.  Let dry then close the card (you might have to manipulate the underneath mechanism a bit to make it pop up, twist and fold onto itself).  Re-open and decorate.

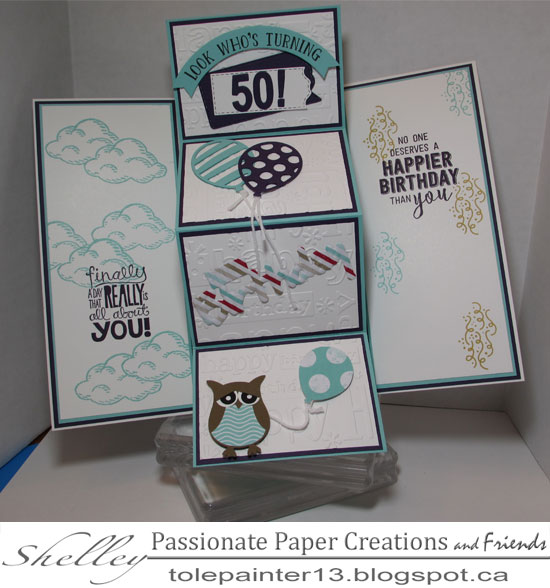
The card I've shown here is 6"x6" finished and the center pop up panel is the only change.  I made it 3-1/2" x 11" scored at 2-3/4", 5-1/2" and 8-1/4".  This width is a little too big for the A2 as it'll show at the bottom (the height - 3-1/2" here - can vary quite a bit but the cardstock "length" is very dependent on your card size).


Hope this helps some.  If you have questions, please feel free to contact me.

Image is from Bloobel Stamps, Champagne Man 
Coloured with Copics

~Shelley